Frequently Asked Question
Storage: How to re-build multiple volumes to use snapshots after upgrading to QTS 4.2.0?
Last Updated 10 years ago
After upgrading to QTS 4.2.0, you can use the QNAP whole volume/LUNs snapshot to quickly restore files to a particular state in the event of data loss. The advantages of snapshots are:

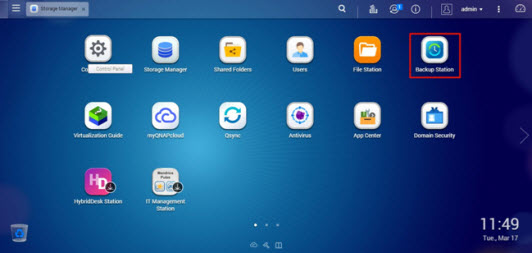
Select the “Backup Station” app from the QTS desktop.
Select “Remote Replication” > “RTRR” > “Create a Replication Job”.

You will see the Synchronization Job Wizard. To proceed after every step, select “Next”. If you have made a mistake or want to change your settings, select “Back.”.

Select a synchronization location, choose “Local folder to local folder/external drive”.

Select the folders you want to backup in “Source Folder”, and where you want to replicate the data to in “Destination Folder”.

 Please note: Files in the Destination folder that do not match files from the Source folder will be deleted by the synchronization function. Please backup this data or move it to another location before proceeding.
Choose “Schedule” and select “Replicate Now” in menu.

Enter a name for the sync job. You can either use the default name or enter one of your choosing.

The sync settings will be shown for your final review.

The settings are now complete and your Replication Job has been set up.

The task will immediately start and your selected data will be synchronized to the external storage.


Please remove all of the iSCSI targets before deleting the volumes.
After delete all the volumes respectively, choose storage pool and go to “Manage” > “Remove” > “Remove Pool”.

Then go to “Storage Space” and choose “New Storage Pool”

Select one or more available drives and the RAID type to use. The estimated capacity will be shown. Select “Create”.

Configure the snapshot protection setting and choose “Create”

The QNAP NAS will beep and start to build the RAID.

You can go to “Manage” to see the building status.

After building the RAID, the status will change to “Ready”. You can now start using the storage pool. Please go to “Storage Space”. Choose “Create” > “New Volume” to create a new volume in the storage pool.

According to personal demand, you can choose Static Volume (better performance), Thick Volume (good performance and flexibility) and Thin Volumes (better flexibility).

By default, almost half of the storage pool capacity will be used. You can change the capacity, alert thresholds and volume alias settings. You can also choose to encrypt this volume.

The volume creation settings will be shown for your final review.

The volume will be built and its status will be shown as “Creating…”

After building the volume, the status will change to “Ready”. You can now start using the volume.
If necessary, you can build multiple volumes using these steps.

- Space efficient and up to 256 copies for each volume
- File-level recovery and one-click instant recovery
- Flexible multi-site restore to a local NAS or remote server
Backup data to external storage
Attach the external storage to the QNAP NAS.Select the “Backup Station” app from the QTS desktop.
You will see the Synchronization Job Wizard. To proceed after every step, select “Next”. If you have made a mistake or want to change your settings, select “Back.”.
Select a synchronization location, choose “Local folder to local folder/external drive”.
Select the folders you want to backup in “Source Folder”, and where you want to replicate the data to in “Destination Folder”.
Choose “Schedule” and select “Replicate Now” in menu.
Enter a name for the sync job. You can either use the default name or enter one of your choosing.
The sync settings will be shown for your final review.
The settings are now complete and your Replication Job has been set up.
The task will immediately start and your selected data will be synchronized to the external storage.
Create a new storage pool and a new volume
Go to “Storage Manager” > “Storage Space”. Choose a designate volume and go to “Manage” > “Remove” to remove your existing volumes. This will also terminate all of the services on your QNAP NAS.After delete all the volumes respectively, choose storage pool and go to “Manage” > “Remove” > “Remove Pool”.
Then go to “Storage Space” and choose “New Storage Pool”
Select one or more available drives and the RAID type to use. The estimated capacity will be shown. Select “Create”.
Configure the snapshot protection setting and choose “Create”
The QNAP NAS will beep and start to build the RAID.
You can go to “Manage” to see the building status.
After building the RAID, the status will change to “Ready”. You can now start using the storage pool. Please go to “Storage Space”. Choose “Create” > “New Volume” to create a new volume in the storage pool.
According to personal demand, you can choose Static Volume (better performance), Thick Volume (good performance and flexibility) and Thin Volumes (better flexibility).
By default, almost half of the storage pool capacity will be used. You can change the capacity, alert thresholds and volume alias settings. You can also choose to encrypt this volume.
The volume creation settings will be shown for your final review.
The volume will be built and its status will be shown as “Creating…”
After building the volume, the status will change to “Ready”. You can now start using the volume.
If necessary, you can build multiple volumes using these steps.
Restore data to the new volume
Lastly, you will need to restore the data to designated volumes you have just created. You can use the “RTRR” function in “Backup Station” to help you transfer the data. Just select your backup device in “Source Folder” and specify the Destination folder in your new volume.GTLv150519