Frequently Asked Question
HD: How to assign a static IP Address for HD camera?
Last Updated 10 years ago
Suitable for all HD cameras.
Method 1: Configure IP in IP Camera Tool
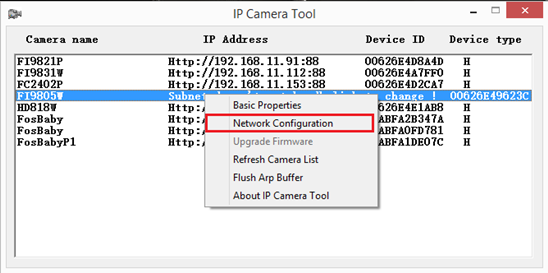
Step 1: Power on camera and hook it up to your router. Choose your camera IP and then right click it and go to Network Configuration;
Note: Someone may find an error message “Subnet doesn’t match, dbclick to change”, the issue can be addressed by following the steps below to assign a static IP manually.
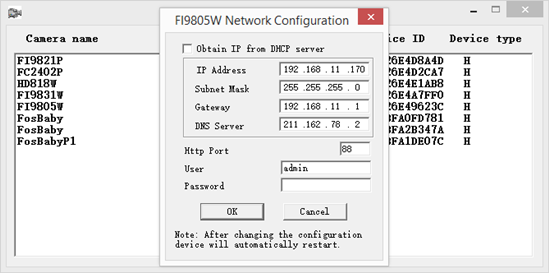
Step 2:Set a proper IP address for camera.
Preparation:
1. Access to the router your camera connected;
2. Go to the Status/Overview/Summary menu;
3. Find and write down the Gateway and DNS server your router having;
4. Then go to DHCP list, it will tell you how many devices are connecting to this router.
Set IP address for camera:
1.The first three numbers of camera’s IP address are the same as router which the camera is connected, the last number is between 1~255 and it’s unique on this network;
2. Subnet mask is 255.255.255.0;
3. Gateway and DNS Servers should be the ones you have found;
4. Set an unique http port number for camera, better to choose a four digital one, like 9821;
5. Enter camera’s user and password, and then click OK to save the settings. The default user is ‘admin’ and password is blank.
Method 2: Set static IP address on web interface---need to access your camera first
Step 1: Log into camera, and go to Settings---> Network---> IP Configuration menu. And un-check the Obtain IP from DHCP.
The first three numbers of camera’s IP address are the same as router which the camera is connected. The last number is between 1~255 and it should be unique in this network;
2.Subnet mask is 255.255.255.0;
3.Gateway and DNS Servers are both the IP address of the router;
4.Save the settings.
Method 1: Configure IP in IP Camera Tool
Step 1: Power on camera and hook it up to your router. Choose your camera IP and then right click it and go to Network Configuration;
Note: Someone may find an error message “Subnet doesn’t match, dbclick to change”, the issue can be addressed by following the steps below to assign a static IP manually.
Step 2:Set a proper IP address for camera.
Preparation:
1. Access to the router your camera connected;
2. Go to the Status/Overview/Summary menu;
3. Find and write down the Gateway and DNS server your router having;
4. Then go to DHCP list, it will tell you how many devices are connecting to this router.
Set IP address for camera:
1.The first three numbers of camera’s IP address are the same as router which the camera is connected, the last number is between 1~255 and it’s unique on this network;
2. Subnet mask is 255.255.255.0;
3. Gateway and DNS Servers should be the ones you have found;
4. Set an unique http port number for camera, better to choose a four digital one, like 9821;
5. Enter camera’s user and password, and then click OK to save the settings. The default user is ‘admin’ and password is blank.
Method 2: Set static IP address on web interface---need to access your camera first
Step 1: Log into camera, and go to Settings---> Network---> IP Configuration menu. And un-check the Obtain IP from DHCP.
The first three numbers of camera’s IP address are the same as router which the camera is connected. The last number is between 1~255 and it should be unique in this network;
2.Subnet mask is 255.255.255.0;
3.Gateway and DNS Servers are both the IP address of the router;
4.Save the settings.
ZGTLv151102