Frequently Asked Question
File Access: How to use File Station to manage files on a QNAP NAS?
Last Updated 10 years ago
File Station is the file manager for QNAP NAS. No matter where you are, you can easily upload, download and manage NAS files using a web browser. You can also create remote connections with "Cloud service" and "Remote device network protocol", allowing you to manage all of your files across different servers and services.
Transcode video files to multiple resolutions with universal file formats to make it easier to play them on various devices and on slower/restricted Internet connections.
Six cloud services are currently supported. Before using this function, you must install "Connect to Cloud Drive" from the App Center.
The remote connection default setting is "Admin only". If you want to change this setting, select “ ” and choose "Remote connection" to modify it.
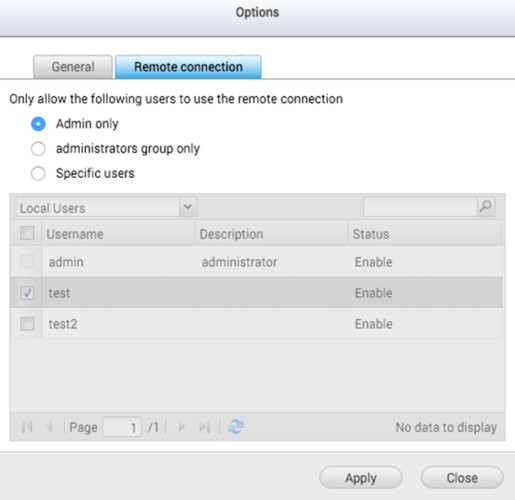
The remote connection default setting is "Admin only". If you want to change this setting, select “” and choose "Remote connection" to modify it.
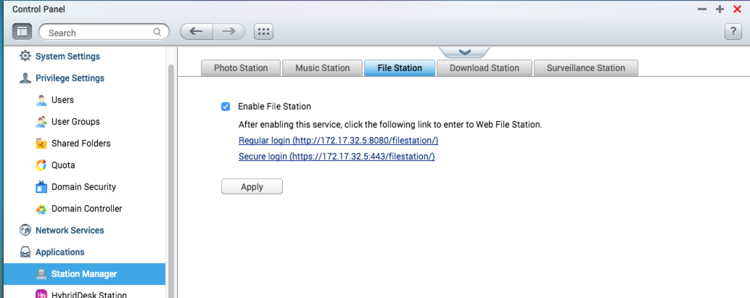
Enable File Station
Go to "Control Panel" > "Applications" > "Station Manager", choose "File Station" then "Enable File Station".Upload files to your NAS
- Choose the destination folder from the left bar.
- Select “
 ” and choose to upload files or folders.
 - After that, you will be prompted on how to deal with files with identical names in the destination folder:
- Skip the files: Do not upload files with the same name.
- Overwrite the files: Upload the files and replace the ones that already exist in the destination folder.
- The files will then be uploaded to the NAS.
Create NAS folders
- Choose the directory you want to create a folder in and select “
 ”.
”. - Choose the privilege type that the folder will have:
- Folder: Create a normal folder.
- Shared folder: Configure user access privileges and other advanced settings.
- Share a space with a user: Create a new user and share NAS with them.
Play NAS media files with Network Media Player
- Go to “Control Panel” > “Applications” > “DLNA Media Server”.
- Select “Enable DLNA Media Server”.
- Choose the files you want to play with the network media player and select “
 ”.
”. - All of the media players on the same network will be displayed.
- Choose the network media player you want to use, select "Play the selected item on this player. Please select files to stream" then press "OK".
- You will see the below window, meaning the files are being played on the network media player.
Search for NAS files
- Find the folder you want to search for in the left bar, and then enter the keyword in the top search bar.
- By selecting “
 ” you can filter file types.
 - Choose "Advanced Search", set the search rules then enable "Filter based on the rules specified above" and click "Search".
- The search results will be displayed below the advanced search bar.
Share NAS files
- Choose the files want to share and select “
 ”.
”. - Choose your sharing method: "Via Email", "To Social Network", "Create share link only" and "To NAS user".
Share NAS folders (allow file upload to this folder)
- Right click on the folder you want to share and select "Share".
- Choose your sharing method: "Via Email", "To Social Network", "Create share link only" and "To NAS user".
- Enable "Allow file upload to this folder" to allow your friends to add files to this folder.
- To open the shared link, select the upper right "Upload" button and you can upload files to the QNAP NAS.
- To open the shared link, select the upper right "Upload" button and you can upload files to the QNAP NAS.
Transcode media files
Transcode video files to multiple resolutions with universal file formats to make it easier to play them on various devices and on slower/restricted Internet connections.- Choose the files want to transcode, right-click and choose "+Add to Transcode (Beta)".
- Select the resolutions you want to transcode to and select "OK".
- After transcoding, the new video files will be saved in a sub-folder titled "@Transcode".
Create remote connection—Cloud service
You can copy files from cloud services to the NAS or vice versa.Six cloud services are currently supported. Before using this function, you must install "Connect to Cloud Drive" from the App Center.
- Press “
 ” and choose "Create remote connection".
 - Choose a "Cloud service" to establish a connection.
- After choosing a cloud service, press “Next” (the following example will use Dropbox.)
- Sign in using your cloud service account.
- You must read and agree to the terms and conditions to use this function.
- Enter a connection name and select “Apply”.
- This connection will be saved in the left bar under the cloud service name.
The remote connection default setting is "Admin only". If you want to change this setting, select “
Create remote connection—Remote device network protocol
- Press “” and choose "Create remote connection".
- Choose a "Remote device network protocol" to create a connection.
- After finishing, press "Next" (the following example will use Microsoft Networking.)
Set the "Hostname/IP", "Account", "Password", and "Connection name", then press “ ” and enable "Mount specific folder".
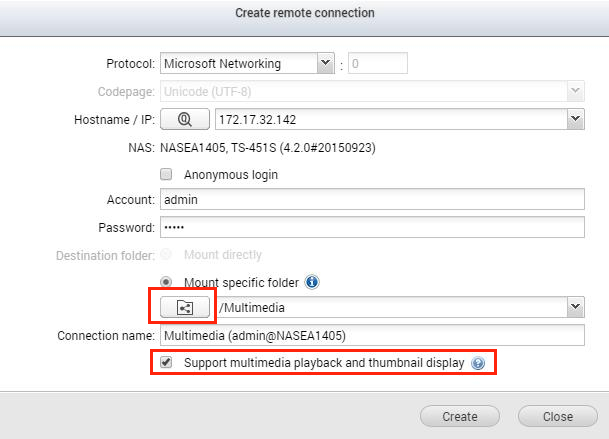
- Microsoft Networking supports multimedia playback and displaying thumbnails for a better user experience at the cost of requiring some additional disk space. This can be disabled if it is unnecessary. If the remote destination is a QNAP NAS, it must have firmware 4.2.0 (or above) before using this feature.
- You will then see the mounted folder.
The remote connection default setting is "Admin only". If you want to change this setting, select “
How to activate File Station's “Show files and folders of my PC” via Firefox and IE
- This function requires a Java plugin/add-on in your web browser.
Chrome after version 45 no longer supports NPAPI (a function required for Java applets) so it does not support this function.
Microsoft Edge does not currently support any add-ons, so it also does not support this function.
Please refer to the following link: https://www.java.com/en/download/help/enable_browser.xml
- Please go to below link to download Java on your platform. https://java.com/en/download/
- Reboot your browser to make it detect the Java installation.
- Open Firefox or Internet Explorer, connect to your NAS and run File Station. A message will pop up asking you to run a Java application. You have to choose “Run”.
- When prompted to "Allow access to the following application from this web site" choose “Allow”.
- Enter File Station, select the “
” button and enable “Show files and folders of my PC”.
- You will now see your PC in the left bar.
How to activate File Station's “Show files and folders of my PC” via Safari
- This function requires a Java plugin/add-on in your web browser.
Chrome after version 45 no longer supports NPAPI (a function required for Java applets) so it does not support this function.
Microsoft Edge does not currently support any add-ons, so it also does not support this function.
Please refer to the following link: https://www.java.com/en/download/help/enable_browser.xml
- Please go to below link to download Java on your platform. https://java.com/en/download/
- Reboot your browser to make it detect the Java installation.
- Open Safari, connect to your NAS and run File Station. A message will pop up asking you to run a Java application. You have to choose “Run”.
- When prompted to "Allow access to the following application from this web site" choose “Allow”.
- Go to “Safari” > “Preferences”.
- Go to “Security” and select “Plug-in Settings”.
- Find “Java”, choose the NAS IP/website to enable this function on and enable “Run in Unsafe Mode”.
- Enter File Station, select the “
- You will now see your PC in the left bar.
How to share a folder on your PC with your network—Windows 10
- Right click on the folder you want to mount and select “Properties”.
- Go to the “Sharing” tab and select “Share...”.
- Use the dropdown list to choose users to share with, and then configure the Permission Level settings.
- If you want to share this folder with "Everyone" in step 3 then you have to open “Network and Sharing Center” and select “Turn off password protected sharing” in “All Networks”> “Password protected sharing”.
- To mount this folder in File Station, refer to Create remote connection—Remote device network protocol and choose “Microsoft Networking”.
Hostname/IP: PC’s IP address.
Account/Password: Enter the user’s username/password from Step 3. If you selected “Turn off password protected sharing” then you can use “Anonymous login”.
Mount specific folder: /Share_folder_name.
How to share a folder on your PC with your network—Mac
- Open “System Preferences” and choose “Sharing”.
- Enable “File Sharing” then select “+”to choose folders you want to share.
- Select “Options...”, enable “Share files and folders using SMB” and enable “Windows File Sharing”. Sharing files and folders on a Mac using SMB requires the user’s username on this computer.
- To mount this folder in File Station, refer to Create remote connection—Remote device network protocol then choose “Microsoft Networking”.
Hostname/IP: PC’s IP address.
Account/Password: Enter this PC’s username/password.
Mount specific folder: /Share_folder_name.
Notes: User’s “Account name” and “Full name” may be different. Here we need to enter “Account name”.
ZGTLv160106