Frequently Asked Question
General: How to set up MailPlus Server on your Synology NAS?
Last Updated 10 years ago
Overview
With the Synology MailPus Server package, your Synology NAS can become a mail system that supports SMTP, POP3, and IMAP. User accounts and email messages can be centrally managed and archived on your Synology NAS. In addition, the MailPlus package provides DSM users with an easy-to-use, browser-based email client for viewing, managing, and sending messages.The following sections will help you get started with MailPlus Server and MailPlus on your Synology NAS.
1. How does email work?
Whenever you send an email, your mail user agent (MUA) interacts with the mail transfer agents (MTA) in order to get the mail to the right destination. Check out the illustration and explanation below. 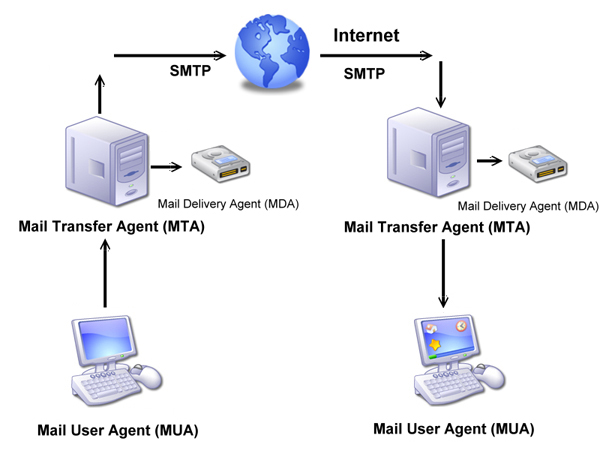
1.1 Mail User Agent (MUA)
A mail user agent (MUA) is an application (e.g., Outlook Express, Thunderbird) that runs on a user's computer. Mail user agents are used to compose and send messages, as well as to display and manage messages in a user's mailbox.1.2 Mail Transfer Agent (MTA)
Mail transfer agents (MTA) are used to pass emails between different mail servers. When a mail user agent passes a message to a mail transfer agent, the latter passes the message to another transfer agent (or possibly many other transfer agents). Transfer agents are responsible for properly routing messages to the destination. Synology's MailPlus Server package allows a Synology NAS to handle some functions of a mail transfer agent and mail delivery agent (see below).1.3 Mail Delivery Agent (MDA)
Mail delivery agents (MDA) are used to place messages into a local user's mailbox. When the message arrives at its destination, the final transfer agent gives the message to the appropriate delivery agent, and the latter delivers the message to the user's mailbox.1.4 Simple Mail Transfer Protocol (SMTP)
Simple Mail Transfer Protocol (SMTP) is an Internet standard for email transmission over Internet Protocol (IP) networks. While mail transfer agents use SMTP to send and receive mail messages, mail user agents only use SMTP for sending messages to a mail system for relay.2. Before you start
Some preparation work is required to get MailPlus Server running smoothly on your Synology NAS. Before proceeding, please pay special attention to the information below.2.1 Connect Synology NAS to the Internet
There are three ways to connect your Synology NAS to the Internet: direct connection, PPPoE connection, or connection through a router. For details about accessing your Synology NAS via the Internet, refer to here.Having an external static IP address is crucial for a mail system. Although it is possible to run a mail system with a dynamic IP address, it is not as reliable as using a static one. We thus recommend registering an external static IP address for your mail system. For more information, please contact your Internet service provider (ISP).
2.2 Set up DNS
A valid, registered domain name is required to allow clients to deliver emails to MailPlus Server over the Internet. In addition, you'll need to set up the MX record and A record of your DNS server.MX record, or Mail Exchanger record, is a type of resource record in the Domain Name System (DNS). It specifies how Internet email should be routed using Simple Mail Transfer Protocol (SMTP). Each MX record contains a hostname and a preference. A hostname guides emails to arrive at the right destination. A preference points out the relative priority of various servers.
For example, to make sure an email address like "alex@example.com" works properly, you have to set up the MX record of the domain "example.com". To do so, you need to point the MX record to the IP address or domain name of your Synology NAS. If you already have registered a domain name, you'll be able to modify these settings in the management console for that domain name.
If you don't have a registered domain name, you can apply for a free DDNS domain name (although this might affect the usability of your mail server). It is recommended to have a static IP address with DDNS to ensure that the email delivery is more reliable. You can apply for a registered DDNS hostname by logging into DSM and going to Control Panel > External Access > DDNS.
2.3 Reverse DNS setup
The process of assigning specific DNS records to a domain name is known as Forward DNS. This is what leads the domain name to the exact server. However, there is also a reverse process, known as Reverse DNS.- What is reverse DNS?
Reverse DNS refers to translating the numeric addresses of a website (i.e. the IP address) to the domain/hostname, as opposed to the forward DNS process which translates the domain/hostname to the IP address. Reverse DNS refers also to locating which domain name/host belongs to a given IP address; that is why this process is often referred to as Reverse DNS Lookup. When a domain name has a valid reverse DNS, it can also be accessed by just using the IP address. - What does reverse DNS do?
Why would you need a reverse DNS set up for your mail server? Reverse DNS is one of the basic requirements for running a mail system. It is often used as a spam filter to determine whether the IP address of the incoming message matches an authenticated domain name, and to block the message if it doesn't. If you don't set up Reverse DNS for your mail server, messages sent from your mail server will be blocked by most major email services.
If you cannot set up reverse DNS by yourself and keep on experiencing email delivery problems, please add another SMTP server for normal email delivery. We recommend that you use a more well-known SMTP server to avoid being taken as spammer when sending an email. - How to set up Reverse DNS
Set up Reverse DNS on your own host -- Some ISPs may delegate a portion of the zone to you so that you can host your own reverse DNS. You can configure Reverse DNS by determining PTR records in a DNS server. PTR records are managed by the entity that controls the IP address assigned to you. It may be either your host or yourself, if the host has delegated the Reverse DNS for your IP space (containing one or multiple IP addresses) to you. A PTR record usually represents the IP entered backwards, followed by an in-addr.arpa entry.
Set up Reverse DNS with your ISP -- The ISP or entity that owns your IP address is the only one who can add the appropriate PTR records. You may have to contact them for Reverse DNS configurations.
3. Get started with MailPlus Server
To start installing and setting up MailPlus Server, please follow the steps below.3.1. Install MailPlus Server
Go to Package Center to find and install MailPlus Server.
3.2. Set up MailPlus Server
Once the installation is complete, you can start setting up MailPlus Server. In the section below, we will see how to enable SMTP (Simple Mail Transfer Protocol). Please remember that the screenshots below are for reference only, and your settings may differ.Important:
- For educational purposes, we'll use a free domain name provided by Synology in the instructions below. This domain name does not provide options to manage DNS records (which means we may encounter problems when sending messages to major email services), but is sufficient for practicing and learning about MailPlus Server. If you'd like to register for a free Synology domain name, please go to Control Panel > External Access > DDNS > Add.
- Launch MailPlus Server, and choose Create a new mail system if you want to set up a whole new mail system, and click Next to continue the setup. Otherwise, you can choose to Create a mail system by migrating the data from a previously installed Mail Server Package. Check the tutorial on how to migrate Mail Server to MailPlus Server here.
- Enter your registered domain name in the Mail System Hostname field. This domain name appears after the @ in users' email addresses. For example, if "mydomainname.com" is entered here, then the email addresses of your users will be like "username@mydomainname.com".
- You can modify the following additional settings according to your needs:
- Account type: Select which user account types (local, LDAP, or domain users) shall be allowed to use the services provided by MailPlus Server.
- Network Interface: Select which LAN port should be used for MailPlus Server.
- Volume: Select which volume in which MailPlus Server and its data will be stored.
- Click Next to check the summary of the setup, and click Apply to finish.
- Log in to your Synology Account for license registration.
- MailPlus Server is installed with 5 free email accounts by default, and you can add more licenses in the License page if you need to activate more email accounts. For more information on the MailPlus license mechanism, please refer to here.
4. Access emails on Synology NAS with MailPlus
MailPlus is an add-on package that provides a web-based interface for users to access and manage emails hosted on the Synology NAS. In addition, multiple POP3 accounts can be created in MailPlus, allowing users to receive and store messages with other email services (e.g., Gmail, Office365).4.1 Install MailPlus
- Go to Package Center to install MailPlus.
- Go to Control Panel > Privileges, and allow your accounts to access MailPlus.
4.2 Run MailPlus
- There are two ways to launch the MailPlus login page:
- Go to Main Menu > MailPlus
- Access MailPlus directly via Application Portal. Enter the name of your Synology NAS followed by "/mail" in the address bar of your web browser. For example, if your Synology NAS is called mydiskstation, enter mydiskstation/mail. Please find how to enable Application Portal here.
- Go to Main Menu > MailPlus
- Enter your DSM username and password to log in.
- If the settings of MailPlus Server has already been configured before the installation of MailPlus, the SMTP settings of MailPlus Server will automatically appear in Settings > SMTP.
5. Access emails on Synology NAS with other email clients
Email accounts on the Synology NAS can be linked with various mail clients, such as Microsoft® Outlook® or Mozilla® Thunderbird™. In the example below, we'll show you how to use Thunderbird to access an email account hosted on the Synology NAS.- Launch MailPlus Server, and go to the IMAP/POP3 page to enable IMAP or POP3 depending on the client.
- Launch Thunderbird on your computer, and click Create a new account.
- Click Skip this and use my existing email.
- Enter the name, email address, and password for your DSM user account. (For example, "hector@mydomainname.synology.me".) Click Continue.
- Thunderbird searches for your address. If your settings are correct, you'll see the screen below.
- Now the email of the selected account will be displayed in Thunderbird!
6. Troubleshoot
6.1 Why can't I send or receive emails via webmail from MailPlus?
- Check if the settings on your MailPlus such as SMTP, DNS, and MX are correct.
- Check if the Internet settings of your Synology NAS are correct. Go to Control Panel > Regional Options. Under the Time tab, tick Synchronize with a NTP server and click on the Update Now button to examine if the Internet settings are correct. If the result comes back successfully, the settings are correct.
- Check if the port number on your router is correct.
- Please visit this website to check if your IP is listed as spammer. If so, remove your IP from the block list on the same website.
6.2 Why can't I send or receive emails via my email clients?
- Check if you have enabled protocols for IMAP and POP3.
- Check if your username and password are correct.
- Check if the settings on your MailPlus such as SMTP, DNS, and MX are correct.
- Check if the Internet settings of your Synology NAS are correct. Go to Control Panel > Regional Options. Under the Time tab, tick Synchronize with a NTP server and click on Update Now button to examine if the Internet settings are correct. If the result comes back successfully, the settings are correct.
- Check if the port number on your router is correct.
- Check if your IP is listed as spammer. Go to http://www.spamhaus.org/sbl/ to check out. If so, remove your IP from the block list on the same website.
6.3 Why can't I receive emails sent from another email server (e.g., Gmail)?
- Make sure the DNS is correctly configured. You will need to point the MX and A records to Synology NAS, so that other email servers can find the Synology NAS.
- Make sure Synology NAS has a static IP address and is connected to the Internet, or your domain name points correctly to your dynamic IP.
- If the Synology NAS is set behind the NAT firewall/router, please make sure the port forwarding works properly. You can check whether the port forwarding works by going to the http://canyouseeme.org/ and inputting the port 25.
- Check the message in the returned mail if any. So you can find the detailed reason of the error.
6.4 Why do I get rejected when I send emails to certain webmail accounts, like those of Gmail or Hotmail?
Many free email providers do a reverse DNS lookup to check the validity of the sender. If your reverse DNS lookup doesn't correspond to the sending domain name, you emails will be rejected. Please check with your ISP. Another possibility is that your IP address is listed in the SPAM block list. You can check this by visiting this website: https://www.spamhaus.org/sbl/ ZGTLv160424