Frequently Asked Question
Cloud Service: How to back up the data in my Google Drive with Synology?
Last Updated 10 years ago
Overview
Nowadays, services like Google Drive, Dropbox, or OneDrive have become essential to us. These public cloud services carry a big portion of our lives; important work documents, research references for a thesis, or photos and videos with our precious memories. We would all feel more assured if this irreplaceable data could be backed up securely. Synology Cloud Sync offers a solution to back up all of them to the safety of your home.1. Before you start
Please do the following:- Make sure your DiskStation is running DSM 6.0.
- Install and run Cloud Sync on your Synology NAS. For instructions on how to install packages, please see here.
2. Back up data to your Synology NAS
- Open Cloud Sync and the cloud provider of your choice. In this tutorial we will demonstrate with Google Drive.
- Log into Google Drive and allow Cloud Sync access to your account.
- Once connection has been established, you can begin configuring your backup.
- There are two ways in which you can back up your Google Drive to your Synology NAS:
- You can back up your entire Google Drive to a local folder by selecting the Root folder as the Remote path. In this case there will be only one sync task in this connection.
- You can also choose a pair of local and remote folders to keep synced. In this case, you can create a second sync task later.
- Now you can set a Sync direction. Since you are backing up your Google Drive to your Synology NAS, select Download remote changes only.
- Tick the option to Convert Google online documents to Microsoft Office or jpeg formats if you want your Google online documents backed up into locally accessible formats. To ensure files that may have accidentally been removed on the public cloud are still safely backed up in your NAS, tick Don't remove files in the destination folder when they are removed in the source folder.
- Once you have finished configuring your back up, click Next.
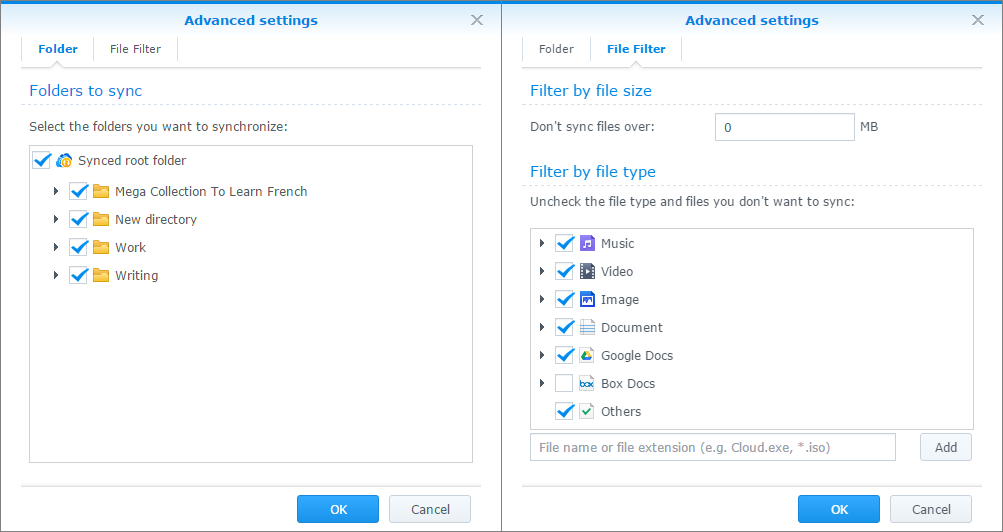
- Review your settings and click Advanced Settings if you want to configure selective sync to filter unwanted folders and file types and size.
- Here you can filter out files or file types you don't want backed up. This helps you to save space and use storage efficiently on the public cloud.
- Click Apply to finish creating your backup task.
- Your back up task has now been set up.
- From the Task list tab you can click Create and repeat the above steps to add a second pair of folders to sync in this connection.
- You can now monitor the progress from Cloud Sync system tray. From now on, whenever a new file is added to your Google Drive, it will be automatically fetched from the cloud.
ZGTLv160502