Frequently Asked Question
HD: How to assign a static IP for your camera on Mac?
Last Updated 11 years ago
Step 1: Connect camera and your Mac computer to the same router.
Step 2: Find your Mac computer's IP configuration.
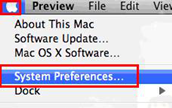
1. Click the Apple menu and select System Preferences.
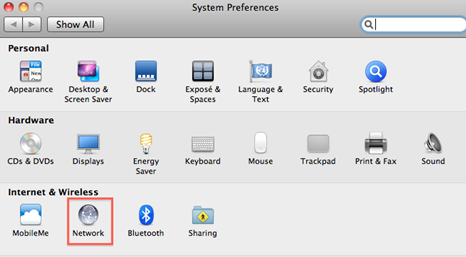
2. When the System Preferences screen appears, please look for Internet & Wireless section and click Network.
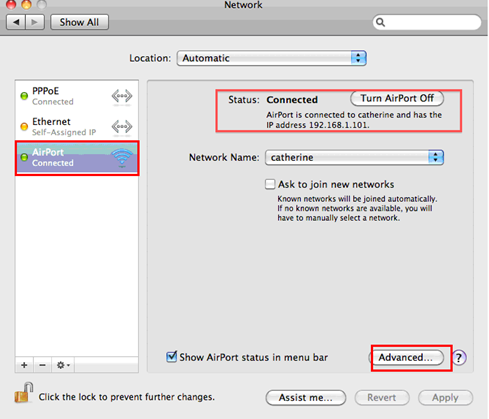
3. Under the Network screen, please select Airport, and then click Advanced.
4. Click TCP/IP-->In the Configure IPV4 box, you'll find your router’s IP address there.
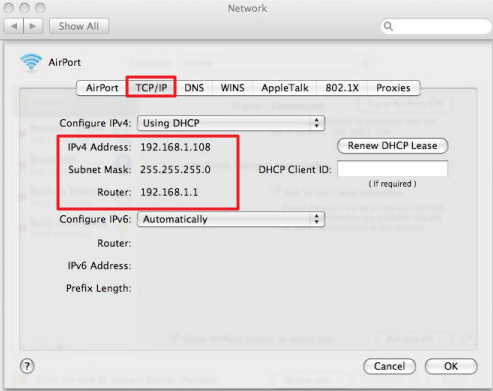
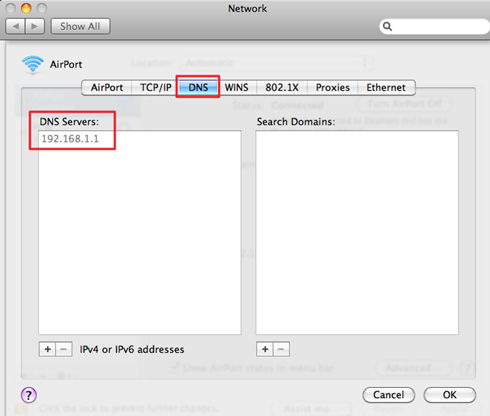
5. Click DNS, and you can find out your router’s DNS server.
Step 3:
Setup static IP for your camera according to the IP configuration of your Mac.
In this case, you can setup:
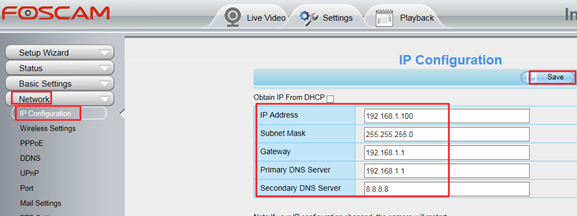
IP address: 192.168.1.100 (Change the last number based on IPv4 address of your Mac, 192.168.1.X, range for X: 2~253)
Subnet mask: 255.255.255.0 (Same as Mac)
Gateway: 192.168.1.1 (Router IP)
DNS server: 192.168.1.1 (Same as Mac)
1.Method one
Assign a proper static IP on camera WEB page.
For HD camera, configure it under Network-->IP configuration:
For MJPEG camera, configure it under Basic Network Settings:
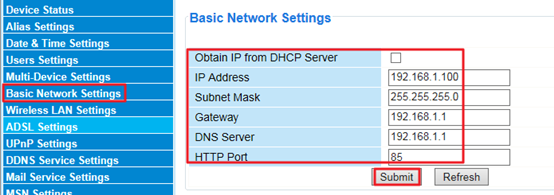
Note: Please remember to click Save or Submit.
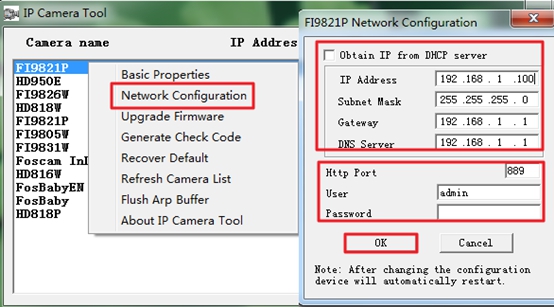
2.Method two
when the WPS method is not working in IP Camera Tool (for both HD and MJPEG cameras)
Highlight and right click on your camera IP and choose Network Configuration, uncheck Obtain IP form DHCP Server. Input the IP settings and your camera login user/password to click OK.
End
Step 2: Find your Mac computer's IP configuration.
1. Click the Apple menu and select System Preferences.
2. When the System Preferences screen appears, please look for Internet & Wireless section and click Network.
3. Under the Network screen, please select Airport, and then click Advanced.
4. Click TCP/IP-->In the Configure IPV4 box, you'll find your router’s IP address there.
5. Click DNS, and you can find out your router’s DNS server.
Step 3:
Setup static IP for your camera according to the IP configuration of your Mac.
In this case, you can setup:
IP address: 192.168.1.100 (Change the last number based on IPv4 address of your Mac, 192.168.1.X, range for X: 2~253)
Subnet mask: 255.255.255.0 (Same as Mac)
Gateway: 192.168.1.1 (Router IP)
DNS server: 192.168.1.1 (Same as Mac)
1.Method one
Assign a proper static IP on camera WEB page.
For HD camera, configure it under Network-->IP configuration:
For MJPEG camera, configure it under Basic Network Settings:
Note: Please remember to click Save or Submit.
2.Method two
when the WPS method is not working in IP Camera Tool (for both HD and MJPEG cameras)
Highlight and right click on your camera IP and choose Network Configuration, uncheck Obtain IP form DHCP Server. Input the IP settings and your camera login user/password to click OK.
End
ZGTLv151101