Frequently Asked Question
File Access: How do I use Qsync to synchronize files on my computers and NAS? (For Mac users)
Last Updated 9 years ago
Getting started
Qsync is a cloud based file synchronization service empowered by QNAP NAS. Simply add files to your local Qsync folder, and they will be available on your QNAP NAS and all its connected devices.Before using Qsync
Follow the 3 steps below before deploying Qsync.- Create user accounts on the NAS,
- Install Qsync Client on your computers and Qfile on your mobile devices.
- Log into the NAS (serving as a Qsync server) from your computers or mobile devices (referred to in this document as Qsync clients.)
Before using the Qsync Client utility, please check that your Mac meets the minimum system requirements:
Operating System: OS X El Capitan (10.11), OS X Yosemite (10.10), OS X Mavericks (10.9), OS X Mountain Lion (10.8).
RAM: 2 GB.
Create user account on the NAS
Please create user accounts for Qsync users.As the NAS administrator, go to “Control Panel” > “Privilege Settings” > “Users” or go to “Qsync”>”Users”, and then click ”Create a User”.
Only NAS administrators can create accounts. If you are not an administrator please have the system administrator create an account for you.
Install Qsync Client utility
Qsync will synchronize all of the chosen files on your computers or mobile devices.Follow the instructions on the “Overview” page to download the utility (log into the NAS, and then go to “Qsync Central Station 2.0” > Overview.)
Or download the utility from the QNAP website: Support > Download> Utilities.
For computers, please download the Qsync Client utility for Mac.
For mobile devices, please download and install Qfile for iOS or Android.
Log into the NAS
After installing the utility, enter the username and password and specify the designated NAS as the Qsync server.To locate the NAS within a LAN environment, simply click “Search” to find it or key in its IP address or name. (e.g. IP address: 10.8.1.20 or 192.168.1.100)
To connect to a remote NAS (over the Internet), please use your myQNAPcloud address to log in. (e.g. andy@myQNAPcloud.com)
Note:If the ports have been changed for the NAS connection, please append the port number to the IP address; otherwise, please only enter an IP address. (Default port number: 8080)
Set up Synchronization folder pairs
Synchronize folder pairs between your folders on a Mac and your NAS. Click “Next” to proceed.Note: To sync with a NAS shared folder, make sure that the NAS administrator has enabled synchronization on this shared folder. This setting can be modified at “Control Panel” > “Qsync Central Station 2.0” > “Shared Folders” on the NAS. After synchronization is enabled, users who have read and write privileges of this shared folder can sync its content with other devices. If the user only has read privileges to the shared folder, every time they add/change/delete a file in the paired local folder, no changes will be made on the NAS.
Click “Edit” to alter the sync folder location and configure Selective Synchronization:
Location: Choose the folder on your Mac to sync with your NAS folder. Selective Synchronization: Select only subfolders of the NAS folder to sync with Macs. This is useful when the size of the NAS folder is larger than the storage capacity of the Mac.
Start using Qsync Client
Click on the Qsync Client icon on the menu bar to bring up the menu.Open the Qsync folder
Now, just copy or move your files to the local Qsync folder in one of your devices, the files will be copied to all your other devices (devices with Qsync installed and are connected to the NAS.)
From now on, you don’t need to copy files back and forth between your PC and external devices or worry about the size of the files as you to try to attach them to an E-mail.
Synchronization
There are a few methods you can synchronize your files. Qsync will automatically synchronize the files among your computers or mobile devices that have Qsync installed, and they will also be synchronized to the Qsync folder on the NAS.- For PCs, drag and drop files directly to the local Qsync folder.
- For mobile devices (Qfile), copy or move files into the Qsync folder.
- For the NAS, copy or move files to the Qsync folder via File Station (web based file explorer).
Note:- If files are “dragged and dropped” into the Qsync folder, they will be moved to the Qsync folder, as supposed to be copied into the folder, if the files and the Qsync folder are located in the same disk drive. The behavior is the same as File Explore in Windows.
- The maximum size of a single file that Qsync can transmit is 500G in a LAN.
- Qsync doesn’t support SAMBA, FTP or AFP for files access. Please access files using File Station or Qsync.
- Qfile can only synchronize the file list and does not download the files to a mobile device. Please download the files when you need them.
Offline editing
You can browse and edit your files offline, and once your device is online, Qsync will sync the files you edited offline for you automatically.Sharing
Share files by download links
You can share files by sending file download links to those who haven’t installed the Qsync Client utility.- For Macs,right click on the file that you would like to share in the local Qsync folder and click on “Share the link.”
- Select to send the link via E-mail or copy the link to others.
- Click “Advanced” to check more options for the link, such as creating a SSL link, the expiration date, or password.
- For the NAS, right click on the file that you would like to share in the Qsync folder within File Station and click on “Share.”
- For mobile devices, launch Qfile to share the file in the Qsync folder by clicking the icon to the right and click “Share.”
- The file recipients can click on the link or copy and paste it to a web browser to download the file.
Share the folders with a group
You can share a folder with a group of users. If any member from the group shares the files in the folder, other members can receive the file.Steps:
- Create user accounts in the NAS for each group member.
- Have Qsync utility installed on each member’s device.
- Right click on the folder that you would like to share in the local Qsync folder and click on “Share this folder as a team folder.”
- Select users from the list of local or domain users.
- All members in the group will receive a file sharing invitation. Once accepted, the group members can start to access this shared folder..
- The team folder will take effect after the invited users accept their invitation.
- Users cannot share the team folders which are shared from others again.
Remote access
Access the NAS over the Internet
To connect to a remote NAS (over the Internet), the administrator must first configure the NAS device name in “myQNAPcloud” (Log into the NAS> NAS Desktop > Click on the myQNAPcloud shortcut.)Next, inform users about the myQNAPcloud web address for their remote access. You can then use the myQNAPcloud address to log into the remote NAS. ( e.g. andy@myQNAPcloud.com)
Note:
- The connection with the NAS over the Internet will be slower compared to a LAN environment.
- As you switch back to a LAN environment where your NAS is located, please reconnect to the NAS via LAN, instead of the myQNAPcloud service for a better connection quality.
- For better performance on file transmission, it is recommended to configure port forwarding on the router if possible.
Sync photos and videos automatically
Qsync can sync your photos and videos on mobile devices to the Qsync folder of across all Qsync clients automatically..Steps:
- Follow the instructions on the “Overview” page to download the utility. (Log into the NAS, and then go to “Qsync Central Station 2.0” > “Overview.”)
- Launch Qfile,
- Click “Settings” on the bottom right side of the screen,
- Scroll down and look for “Auto upload from photo gallery” and click on “Set up now,"
- Select a NAS to upload photos and videos to,
- Select the folder,
- Select “Use default setting” ( /Qsync/Camera Uploads) or select “Set up manually” to set the path,
- Select if you want to upload all photos from photo gallery immediately,
- You can select “Wi-Fi only” to upload files through Wi-Fi and avoid possible expenses associated with the 3G Network,
- The uploaded files will be synced to the “Camera Uploads” folder under the Qsync folder on Qsync client devices.
Synchronization Management
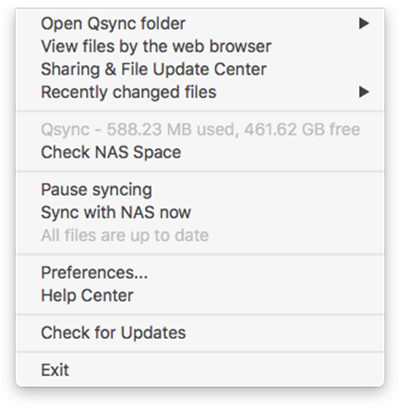
Click on the Qsync icon on the taskbar to see the management functions:- Add files and view the synchronization result on the NAS
- Open Qsync folder: Open the Qsync folder to add files,
- View files by the web browser: Open File Station (web-based file explorer) and browse files in the Qsync folder on the NAS.
- Control synchronization progress:
- Pause syncing / Resume syncing: Click to pause or resume syncing,
- Sync with NAS now: Force Qsync to scan again and refresh the synchronization list.
- Information for syncing and sharing:
- Sharing & File Update Center
- File Update Center: List the file or folder update logs.
- Sharing center: List the folders or files shared with others. Users can choose to accept or decline the team folders. However, users cannot share team folders that are shared by others.
- Recently changed files: List the recently updated file
- Sharing & File Update Center
- Preference:
- General:
- Link Status: Show the current status. Click “Logout” to change users.
- Network Recycle Bin: Browse or recover files deleted from the Qsync folder
- Test connection: If you have problems connecting to the NAS, you can use the Connection Test tool to test the connectivity. In addition, you can obtain upload and download speeds of the NAS.
- Sync:
- Manage paired folders: Manage synchronization paired folders to add, delete, or modify your synchronization tasks
- Import Photos and Videos: Import photos and videos when an USB external device is connected. This feature only applies to photos and videos located under the DCIM folder in the root directory of the USB external device. Default Folder: The default folder for uploading videos and photos from USB external devices or QGenie. Smart Delete: Do not remove any files on the NAS when synchronizing: You can remove files within the local Qsync folder, and files deleted from your computer will not be synchronized with the NAS. The NAS still keeps copies of the deleted files.
- Policy:
- Conflict Policies: The policies for handling the name conflicts between Qsync server (NAS) and clients after it is back online from its disconnection:
- Let me decide for each file by notifying me when a conflict occurs,
- Rename the local files(s),
- Rename the remote NAS files(s)
- Replace local files with the files on the NAS, or
- Replace files on the NAS with local files(s).
- Sharing Policies: The policies of the team folders when other Qsync users share them to this local computer:
- Always reject sharing,
- Automatically accept sharing, or
- Notify me once sharing occurs.
- Filter Settings: During file synchronization, Qsync will not sync the types of files specified in filter settings
- Conflict Policies: The policies for handling the name conflicts between Qsync server (NAS) and clients after it is back online from its disconnection:
- E-Mail:
Set up an E-mail account for sharing files. You can use the NAS SMTP server settings (administrators only), the e-mail account on your PC or you can configure a new SMTP server.
- Advanced:
Startup Settings: Select to launch Qsync at startup.
Notifications: Show desktop notifications when there are file sync activities.
Create thumbnails: Create picture thumbnails on the local device before uploading pictures to the NAS. This helps save NAS resources.
Debug log: The system will record all synchronization activities between your computer and the NAS for diagnosing technical problems.
- General:
Manage or monitor Qsync status via web browsers
Log into the NAS via a web browser and launch Qsync Central Station 2.0.Overview: This page shows the mode of use management (User Customization Mode or Central Configuration Mode) and the total number of online users and devices. It also provides links to File Station and for installing Qsync. In addition, you can enable or disable the Qsync service (administrators only).
- Management settings: This provides a centralized management for administrators to edit default settings of Qsync client utilities
- Users: List information of online users. You can manage the users of the Qsync service here (for administrators only)
- Devices: This table lists the status of connected devices. It also provides options for you to manage each device, allowing you to edit their settings, block them, or to remotely erase them.
- If users log in from their Mac, the name of the device will be shown as their computer name.
- If users log in from Qfile, the name of the device will be shown as Qfile-Android or Qfile-iPhone.
- If users move or copy files to the Qsync folder in File Station, the name of the device will be shown as Qsync-File Station
- Event Logs: Lists the activity details by each user
- Team folder: Users can share their folders. The table lists the information about team folders, including folders that you shared and folders that people shared with you
- Shared folders: Administrators can decide which shared folders will be synced with client devices. If a user has Read/Write or Read-only and synchronization privileges on a shared folder, this shared folder can then be synced with their client device (on Windows only)
- Shared File Links: List the status of shared links
- Version control: You can set the maximum number of versions for your files and check the space used for Version Control
TKCv170626